

As we move further into fall, memories of our summer RVing excursions may still linger in our minds. But with the coming chill, also comes the thought of putting our faithful RV into storage mode. Though seemingly a mundane task, there is a correct methodology for getting your coach ready for any period of non-use; especially if you are contemplating utilizing one of the available private or public storage facilities. Certain precautions, correctly applied, will guarantee your coach will stand a better chance of surviving its secluded hibernation.
The first necessary decision is whether to store your rig at home or off-site at a dedicated RV storage facility. If you have a relatively level space at your residence, there’s no need to spend the bucks at a facility unless security is an issue. But keep in mind, many municipalities are cracking down on stored RVs, (even street parking), within residential areas. It is your responsibility to learn if your home base has any new RV restrictions. Also check your existing CC&R’s, if applicable.
RV Storage Locations
Everything from a vacant dirt lot to an indoor five-star, temperature-controlled facility can be considered for parking your rig for any period of non-use. When deciding which level of sophistication, (and subsequent degree of expense) to evaluate, the primary concern should always be the overall security and welfare of your RV. A nicely paved, inexpensive level lot behind a locked gate might sound appealing at first. If its location is remote, it might not be a wise choice, though. An isolated location might be susceptible to vandals or break-ins. Do your homework when considering such a location.

Also, it’s best to avoid non-paved or non-concreted areas like a grassy or dirt field, even at home. Critters of all types can be invasive in and around an inactive RV. Additionally, dusty or dirty locations will simply equate to more preventive maintenance requirements at some point. Areas of high winds should also be avoided, especially if a total coach cover is employed. Flapping covers can damage the roofing material and the finish on the sidewalls if care is not taken.
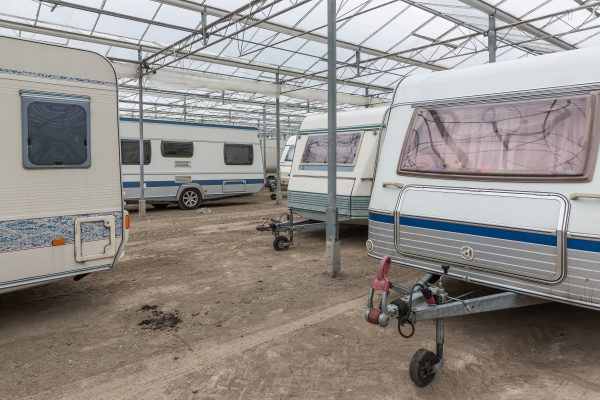
Storage Facilities
A facility designed especially for RV and marine vehicles is preferred, especially if it comes with built-in security precautions. An on-site security guard is a big plus, but strategically mounted security cameras are also a good thing to look for in a suitable site. Well-designed facilities will also have plenty of room between coaches to access storage compartments, generator and appliance access doors, the roof ladder, and the entry door.
Though more expensive, indoor facilities provide the best environment for your dormant RV. Out of the weather, out of the sun and away from ozone bombardment are advantages that will go a long way in preserving your coach.
All RV storage facilities will come with some type of contract, so be sure to read every word as well as the “fine print” twice! Be sure you understand exactly what you are agreeing to! Ask every question before signing on the dotted line.
Call your insurance company and inquire if they have any restrictions, suggestions or comments regarding the facility you are considering. See if you can suspend portions of your benefits during the period of non-use. Not having to pay for collision coverage, for example, will save a few dollars on your premium.
Preparing the RV
Once you’ve made an informed decision as to where your coach will be stored, next it’s time to prepare the coach for its induced hibernation. Be sure to remove all remnants of food from within the RV. As mentioned previously, you certainly don’t want it to appear inviting to the critters! All invasive animals and insects require three things in order to take up residence in your vacated vacation vehicle; food, water and entry. Eliminate any one and your RV is much better off.
Plumbing and Propane
Flush and drain every holding tank. The fresher the tanks, the better the chance of minimizing sewer odor build-up and blockages. Don’t forget to flush and rinse the sewer hose as well! If possible, lubricate the termination valves, but leave them in the closed position.
Some RVers remove every drop of water from the fresh water plumbing system, but if below freezing weather is anticipated, I recommend the wet method of winterizing, whereby RV anti-freeze is pumped throughout the fresh water piping system and poured into every P-trap. Enough anti-freeze should also be flushed down the toilet and sinks; just enough to cover the bottom of each holding tank.
Ensure the propane container is turned completely off and that all the appliances are off. Check the integrity of the cover over the propane regulator.
Dust, Dirt, and Dampness
If outdoors, I recommend cutting cardboard inserts to position inside the water heater and refrigerator exterior access panels to keep the dust and dirt accumulation to a minimum. Cover the furnace intake and exhaust assemblies with blue painter’s tape to keep insects from entering.
Place an opened box of baking soda or an appropriate desiccant/absorbent inside the refrigerator food compartments and prop open the refrigerator door(s).
Turn off all Power
If possible, remove the batteries when expecting sustained below-freezing temperatures or if the coach will be in a remote, unsecured location. Always fully charge all batteries before storing the rig. Once fully charged, employ the battery disconnect device, if so equipped, or at the very least, remove the ground terminals from the batteries to disconnect them totally. Remove all dry cell batteries too!
Turn off all 120-volt (AC) circuit breakers and unplug any device that plugs into a receptacle, such as the refrigerator, microwave/convection oven, washer, dryer, entertainment centers, icemakers, televisions, etc. Rogue lightning strikes, even a couple hundred yards away, can cause problems. Expensive problems!
Protect the Exterior
Thoroughly inspect the underneath portions of the RV. Look closely for any cracks or openings into the floor or interior of the coach. Seal around drain piping, propane tubing and electrical harnesses that extend through the floor into the living areas of the coach.
When parked on asphalt, use non-absorbing, synthetic blocks under the footprints of the tires. If stored outdoors, cover the tires to minimize UV and ozone contamination and obscure the windows to avoid sun damage and the fading of fabrics. In high moisture locales, place absorbent desiccant inside the two major living sections of the RV.
Consider using a total coach cover. If you do, take precautions to keep the cover from rubbing on the roof or at the edges. This can be damaging to synthetic roofing materials such as EPDM rubber or TPO. At the very least, it’s a wise decision to install a rooftop air conditioner cover if a coach cover is not used.
Don’t Forget Ventilation
If possible, leave a roof vent cracked open slightly at one end of the RV and a window cracked open at the opposite end. This will induce a bit of convection airflow inside the coach to minimize the progression of mold and mildew.
Check all window, roof vents and door seals and weather-stripping. As I often mention, moisture intrusion is the biggest cause of RV damage. Also, treat all exposed exterior surfaces with the appropriate protectant.
Periodic Visitation
When possible, visit your hibernating rolling home from time to time; especially if the period of non-use extends past just a few weeks. It’s a wise RVer who changes the position of the RV at least once a month. You should move it forward or backward slightly, to alter the footprint of the tires to prevent flat spots from developing. Just a foot or two is usually all that is required.
It is also recommended to periodically start a gasoline motorhome engine and to exercise a gasoline generator, when so equipped. Consult the owner’s manual for your make of chassis and generator for specific instructions, but the general consensus is to run the generator for a couple of hours at half-load, at least once a month, in order to prohibit varnishing of the fuel. One single two-hour run at half-load is much better than a bunch of short runs. Diesel-powered RVs and generators will likely require different procedures, so be sure to follow the recommendations of the manufacturer to avoid performance issues when it’s time to awaken your resting rig from its respite.
Once a month, carefully inspect the roof for entry points of water intrusion if a total coach cover is not employed. Always perform roof repairs as soon as leaks are discovered. Do not wait until you remove the coach from storage! Any damage will only get worse over time.
What next?
When it is time to remove your RV from storage, always consult with the facility manager to absolve any dispute or damage issue possibly incurred during the storage period before moving the RV. Be sure to re-activate your full insurance coverage!
By carefully determining and acknowledging your requirements ahead of time, and wisely choosing the best-suited storage location, your RV will safely endure its period of non-use and present itself ready for the next step, the spring shakedown! And remember, RVing is more than a hobby, it’s a lifestyle!
Written by – Gary Bunzer AKA “The RV Doctor”
I store my RV at home and keep a dehumidifier inside over the shower. It goes on each night for about 6 hours. It drains into the shower outlet. I keep the exit from the RV open and cover it with fine aluminium screen to keep critters out. I have been doing this for years. My unit has never had moisture or mould problems. I also keep glue pads in several places around the inside, just in case critters or bugs find their way in. Up to now, I have only found an occasional cockroach, to my horror…