
Anyone who travels in an RV with a pet crate knows how much valuable floor space they can occupy. In this post we’ll cover how we “Ikea hacked” our dog kennel to make it a useful part of our living space.
Upgrading Our RV Pet Crate
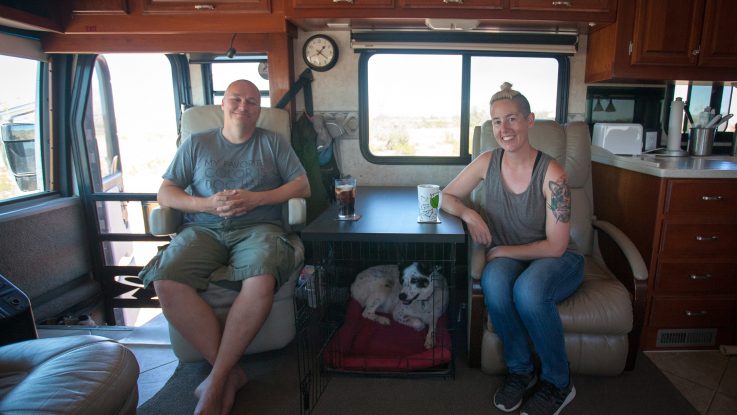
Our dog Lily Goodgirl is named that for a reason. She has free roam of the motorhome at all times.
Our other dog, Mushy, came to us crate trained when we adopted him in 2017. Since we didn’t know how he’d adjust to life with us, we felt it was best to make the crate a part of our living space so he would be safely contained when left unattended. It was also useful to safely separate the dogs when they’re left at home. Overall, they are best buds, but we’ve had an instance or two of growling over bones and we’d rather be safe than sorry.
Also, Mushy loves the crate, and Lily enjoys lounging in it, too. It’s one of the highly coveted nap spots in our Class A, and the dogs would definitely miss it if we took it away.
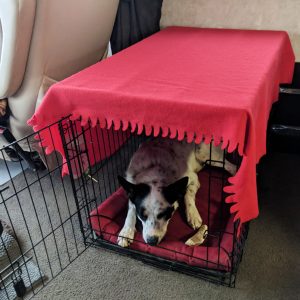
Mushy’s crate is 36″ x 21¾” — a standard size that you’ll find online or in pet supply stores. When we first set it up, we threw a blanket over it so that we could still throw some things on its top in a pinch (since it was close to our entryway), like sweatshirts and backpacks.
Pro-Tip: Mushy isn’t a chewer, but if your dog is, you would not want to put fabric on the crate as they might decide to eat it.
Overall, this was a fine quick-fix for us. But it was ugly and not a solid flat surface, and we knew we ultimately wanted something better. Tommi started researching (#everyoneneedsatommi) and realized that Ikea sold a Linnmon table top (article number 002.513.38) that was 39⅜” x 23⅝”, the perfect size to rest on top of Mushy’s crate! And for a price of $13.99, there was very little to lose with experimenting in upgrading Mushy’s kennel.
How to DIY Your RV Pet Crate
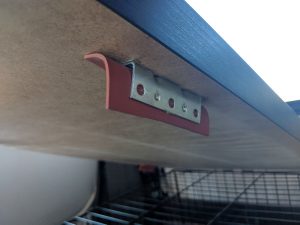
We knew we wanted to be able to collapse the crate if needed, so we didn’t permanently attach the table top to the crate. Instead, it’s held in place with wide metal L-brackets. The L-brackets are attached with rubber gaskets to keep the table top quiet and in place. Plus, the brackets help prevent paint scratches.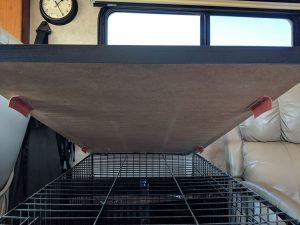
Here’s How:
- Lay the table top on the crate and center it well.
- Slip the L-brackets in place against the edges of the crate. We used four brackets total on the sides. Leave a little wiggle room or the top will be very hard to put in place.
- Use a pencil to trace the bracket locations.
- Remove the table top and place it upside down on something soft.
- Use the pencil markings to place the L-brackets, making sure they’re “hugging inward,” and screw them in. Ideally, use counter-sunk screws to make attaching the rubber gaskets easier. Make sure your screws aren’t too long, or they might go all the way through the table top.
- Cut strips of rubber gasket material slightly bigger than the inside of an L-bracket. Put two small drops of superglue on both inside flat surfaces of an L-bracket. Use a clamp or something heavy to keep the gasket material bent until the superglue dries fully.
Pro-Tip: Stay safe with superglue — Tommi chooses to wear the same disposable nitrile gloves that he uses for dump station visits, rather than risk supergluing his fingers together.
Alternatively, you could also use wood trim pieces screwed under the table top to keep it from shifting. In that case, the wood is likely to be a bit more visible when installed, so you could stain it to match the table top.
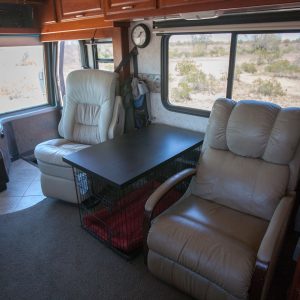
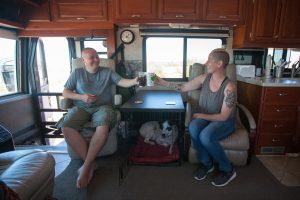
Welcome to “The Office”…AKA Mushy’s RV Kennel
Now Mushy’s crate looks so fancy, we’ve dubbed it his “office.” Granted, we have no idea what business he’s in or what he’s selling, but at least he has a nice space to do it in.
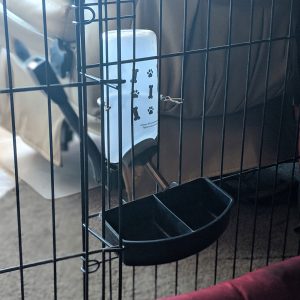
We upgraded Mushy’s crate with a Kong pad and a “hamster water bottle.” However, Mushy didn’t take to drinking from the hamster bottle, so we got him an easier to use clip on water cup, too. We call this the “office water cooler.”
The Finished Product
Do you travel with a pet crate? We’d love to hear what modifications you’ve done to make it suit your RV life! Let us know in the comments below.
Meet the Family
Ane and Tommi, F462447, love how RV life allows them to go on adventures with their rescue dogs. Full-timers since 2016, they share their experiences and review campsites through a pet-friendly lens on Instagram and TheDogisDriving.com.

That is so smart! Where did you find the table top that fit perfectly?
Thanks! The tabletop is from Ikea.
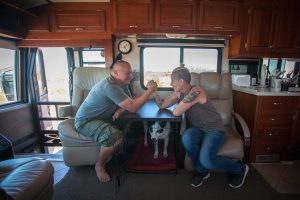
Who won the arm wrestle? Great article. Love the finished product
Do you have any ideas for something that will fit across the RV captain chair and passenger chair. Our 2 maltese want to ride in my lap the entire way and thought if I could build something to go over the dog house engine between us they would ride in there.
Glenda, if your “doghouse” engine cover isn’t flat enough already, you could probably build something that fits the cover shape near the dash and is supported by two feet at the other end, and then put a dog bed (or just blankets) on that. I’d imagine plywood & 2-by-4s would work.
It would probably make getting in and out of the seats more awkward, but your dogs could lounge right up front with you. They would probably try to be in your lap still, but with enough patience and scratches while they’re on the platform, they’d probably settle down there.
Alternatively, you could try making them a “nest” in your feet. Our previous smaller dog Stimpy loved lounging at our feet and always made us give him backrubs with our toes.
As a third option, depending on your dash design, you might be able to hang a basket meant for bicycling with dogs from your dash. The bottom of it could rest on the doghouse, with just a strap keeping it from sliding.