
RV A/C Maintenance Tips

Is it time to perform RV A/C maintenance? FMCA has tips for performing routine maintenance on your RV’s roof-top air conditioner unit(s).
Overall, the average RV owner can perform this RV A/C maintenance in an afternoon. However, it’s important to remember that maintenance is different than repairs. Air conditioner repairs should always be handled professionally. If you believe your A/C is failing, it is best to take it to a professional.
Prior to beginning, turn 120-volts AC power off at the breaker-box or unplug your RV from shore power.
Tip #1 – Filters
You are probably already familiar with this task. All A/C systems, whether in your home or RV, require filter cleaning; some as often as every three months. From inside the RV, access the A/C unit’s filter(s). On some units, you will need to remove the interior air delivery shroud. Consult the owner’s manual if in doubt. Remove and wash all the filters in warm water or simply vacuum them clean.
Tip #2 – Thermostat Sense Probe
Check the positioning of the thermostat sense probe. That’s the thin, pencil-like, copper-looking device attached to the tiny tubing leading to the thermostat. Make sure it is situated in the direct flow of return air to the unit. Look closely for grime or film that may have accumulated from cooking oils and/or smoke. If contaminants are found, gently clean the sense probe. Take special care not to kink the small capillary tubing leading to the probe.
Tip #3 – Electrical Connections
Check the visible electrical connections inside the A/C unit. To eliminate the possibility of road vibrations causing the wire nuts to loosen, always wrap them with electrician’s tape.
Tip #4 – Mounting Gasket
With the interior shroud removed, check the condition of the mounting gasket located between the bottom of the roof-top unit and the roof. It will be visible from inside the RV by looking up into the roof opening. If the gasket looks compressed or if there is evidence of water leaks, it’s time to install a new gasket. Also, tighten the mounting bolts holding the roof-top unit to the inside unit if they are loose.
Tip #5 – Routine Cleaning
This may be the easiest step of RV A/C maintenance! From inside the RV, vacuum in and around all exposed portions of the unit to clear dust, cobwebs, etc.
Tip #6 – Thermostat
If your RV has a wall thermostat containing unenclosed contacts, clean them. Simply slide a business card between them and gently pull the card through the closed contacts a few times. This effectively cleans them without causing damage. Never file or sand thermostat contacts.
Perform RV A/C Maintenance Steps #7 through #10 from the roof. Grab your ladder, and head on up!
Tip #7 – Condensation Drains
On the roof, remove the A/C unit’s outer shroud, exposing the motor and condenser. Look for a series of small drain holes in the mounting pan. These holes drain any moisture produced from the cooling cycle. Clean and verify that all condensate drain holes are open and able to drain.
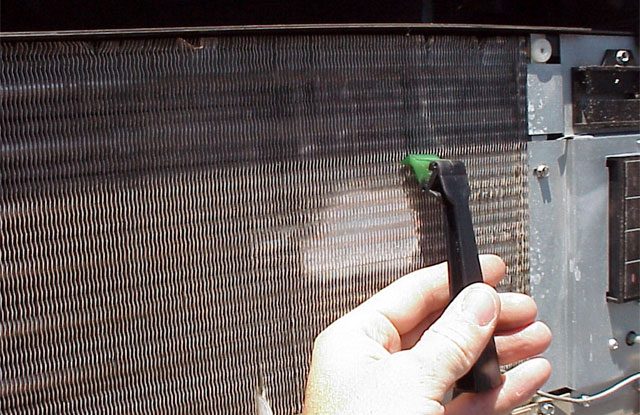
Tip #8 – Condenser Fins
Inspect and clean the exposed condenser fins at the rear of the roof-top unit. Remove any debris that may have collected on or near the condenser. Check for mud dabber nests in this area. Straighten damaged fins carefully. It may be necessary to purchase an aftermarket fin “comb” to safely straighten severely damaged areas. Never use a screwdriver or other sharp object for this task.
Tip #9 – Motor Area
Clean the area in and around the fan motor and compressor. Check the motor mounts for damage and/or fatigue.
Tip #10 – Exterior Shroud
Look closely at the exterior shroud itself. Do you see any damage caused by low hanging branches or gas station overheads? Some minor damage can be repaired; however, if the cover has severe cracks, it needs to be replaced. Replacement shrouds are typically available for purchase at camping goods stores or your local RV dealer. As an alternative to the plastic shroud, consider an upgrade to a sturdier metal or fiberglass cover.
How do you handle hot days while RVing? Do you practice RV A/C Maintenance? Comment below.
This information is for educational purposes. FMCA shall not be responsible nor retain liability for RVer’s use of the provided information. Prior to making any RV service decision, you are advised to consult with an RV professional.
I have a 2018.5 Seneca TS with a bad Coleman Mach 15 heat pump, just blows ambient air (not cold) and tech checked it out and has a bad compressor. You have to buy a new unit because they don’t repair them. Real problem is the unit is on back order and nobody has them in stock. Working with Affinity RV and supposedly they can get one in two weeks. Pretty weak that it goes bad in a little over 2 years, just out of warranty 5/20. By looking on all the RV forums Coleman AC is a real POS? Talked to Airexcel and they told me you just have to pay for one at a supplier so you will be inline for when they become available. He said maybe by winter you might see them in stores lol! Super frustrating to say the least!